Page Builder
Page Builder Overview
TieLabs Page Builder, The most simple and Powerful page builder, at less 5min you'll be able to build your own homepage with the minimal effort you'll imagine. The builder enables you to add unlimited sections with unlimited blocks inside it also you can re-sort sections and blocks as you want.

1. The first Step
1.1 In the Block Editor (Gutenberg)

1.1 In the Classic Editor
 Click on the Use the TieLabs Builder button to convert the page from normal page to our builder. And then, you will be ready to add your new sections and blocks.
2. Add New Section
 Click on + Add Section button to add your first new section. The section window will appear as the following:

- Section Title - With this option, you can set a title for the section.
- Section Width - Select if the interior content is contained to site width or 100% width.
- Sidebar Settings - choose the section layout, without sidebar, right sidebar or left sidebar.
- Sticky Sidebar - check this if you want to put the sidebar of this section in Sticky Mode.
2.1 Section Title

- Section Title - field, what you type will display the above of the section.
- Title URL - set a URL to the section title, leave this field empty if none.
- Title Style - choose from the three available styles:


2.2 Section Background

- Background Color - set the section background color.
- Background Image - choose/upload image as a background image to this section
- Background Video - Youtube, Vimeo or local video URL The video URL will override the background image option.
- Parallax - enable/disable the parallax effect on the background.
- Parallax effect - choose one of the available five effects, Scroll, Scall, Opacity, Scroll+Opacity or Scall+Opacity.
2.3 Section Styling

- Dark Skin - display all the blocks inside this section in the Dark Skin instead of the default light skin.
- Custom Class - set a custom class to this section, if you want more customization.
- Margin Top - if you want more space above of the section.
- Margin Bottom - if you want more space below of the section.
 You can Edit, Delete or Expand/Collapse section.
3. Add New Block
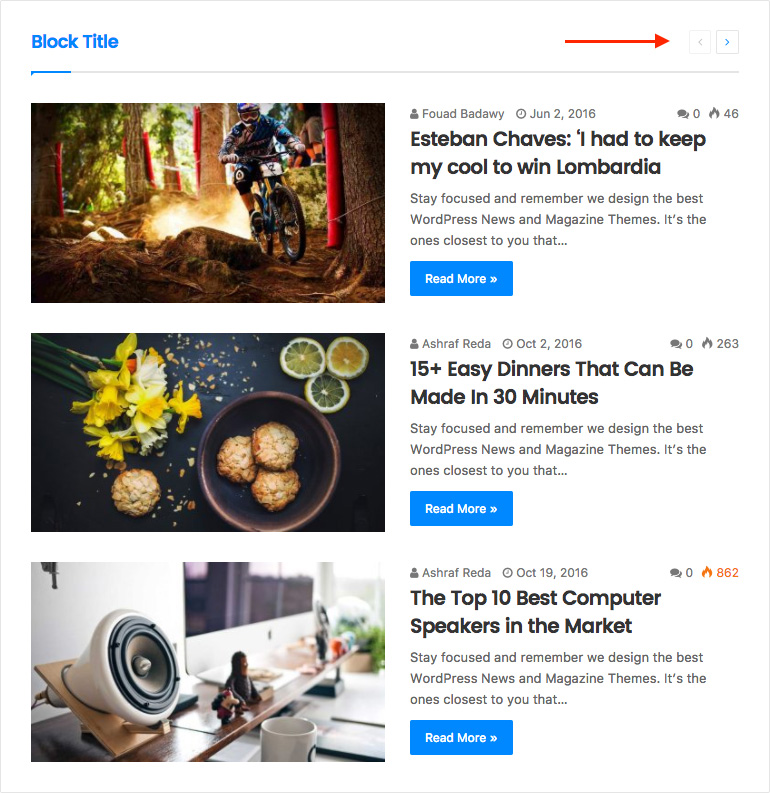
 After finishing the section settings, the section body will display as in the above image and you will find the Add Block button inside it. Click on the Add Block button, the block window with appear as the following:
 You can choose your blocks from a large variety of news blocks. Each block made with more concentrating on the content of news websites so you mostly find that blocks will cover all your needs.
3.1 Block Options

- Choose the block you want, the general and advanced options below blocks thumbnails based on the block you choose, also, the default values based on the selected block.
- Block Title - the title that will display above of the block, leave it empty to hide it.
- Block URL - if you want a custom URL to the block title.
- Categories - Choose the news categories in this block, it's multiple select.
- Tags - display news by tag instead of categories, this option will override the categories options.
- Exclude Posts - Enter a post ID, or IDs separated by a comma to exclude them.
- Sort Order - sort the news in the block by one of the available six values:
- Recent Posts
- Random Posts
- Last Modified Posts
- Most Commented Posts
- Most Viewed Posts
- Best Reviews
- Number of the posts to show
- Offset - Number of posts to pass over, it's very useful if you want to display some of the posts from a specifc category in a specific block, and display the other posts with another block.
- Pagination - choose one of the available four paginations:


3.2 Block Advanced Options

- Show the content Only - display the block without border, padding, and background.
- Ajax Filters - display categories/tags filters beside the block title.
- More Button - when you set a URL to the title, you may want to display More button beside the title, check this if you want. Doesn't display if the URL field is empty.
- Color - block main color, title, links on hover, more buttons, loading icons and so on.
- Post title length - the number of words or characters, search Jannah options panel for Trim Text by to choose trim by words or characters.
- Post Excerpt - show/hide the post excerpt.
- Post Excerpt Length - the number of words or characters, search Jannah options panel for Trim Text by to choose trim by words or characters.
- Read More Button - show/hide read more button below of the excerpt.
- Dark Skin - display block in dark skin.
- Hide Thumbnails - show/hide all the thumbnails at the block.
- Post Meta - show/hide the post meta data (date, author, the number of views and so on..)
- Media icon overlay - show/hide the media (video, audio, and image) icons over the post thumbnails.
4. Re-sort sections and blocks
You can re-sort sections and blocks by drag&drop each of them, and you can move one block from section to another section.

5. Manage Section Widgets
When the section has a layout with sidebar left or right, the sidebar area will display at the section body area, as the following:
 Click on the Manage Widgets button, the Widgets window with display as the following:
 You can drag&drop widgets to the Section Widgets Area.
If you want to choose one of the predefined sidebars, do the following:

- Check the Predefined Sidebar. After that, all the widgets will hide and the Choose Sidebar dropdown will appear
- Choose Sidebar - choose the sidebar from the predefined sidebars.
6. Setting Your Homepage
You can set any page as a Front Page to your site by two ways:
1. Directly from the page
Beside the P age Builder and under the Page Attribute box, you will find the Jannah - Frontpage blox.

2. from WordPress Customize Page
Check this article